Thursday, May 13, 2010

Diving In

May 16-18, 2009

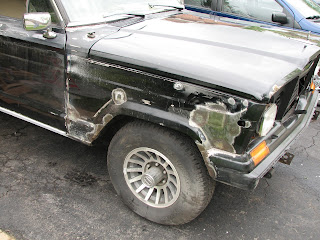
I grabbed at one of those freebie weekends that students get once uni. lets out for the summer, and before they're into summer jobs. Since the job hunting was a little slow, and no one was going to contact me on the weekend anyways, I picked up the cut off wheels, pulled the beast onto the driveway, and began mapping my patchwork with a sharpie.

Sit-rep; there were a good number of rusted out areas, in places that would continue to rust and pucker out any subsequent bondo work. Seeing as I didnt want to make this a rolling Bondo ad, I had already decided the best fix was to cut and remove the badness, and replace it with new 18 gauge steel.

All in all, I think I decided on cutting out 8 of the worst (or most accessible) areas. Some were small (a few sq inches), and some were rather huge, as you'll see.


I wish I knew a little more about welding surface tension before welding in these patches. The tension up front there warped the panel a bit, but I managed to coax it back into place with some light body hammer tapping and a steel dolly.

My largest, most complex patch yet, which encompasses 2 angular body lines, and a sweeping curve, as well as a "cross curve" lip to follow the old fender lip line. Tricky. I decided the best way to tackle it would be to do it in 3 stages, through each of the 3 "stepped" areas.
Step 1 encompassed the first angled body line and fender lip.

Step 2 covered the 2nd patch area, leaving the largest and most complicated for last.

All in all, I was pretty pleased. There is a bit of a recess where patch 2 and 3 meet, along the fender line, but I can probably just bondo that in.

I also patched the top of the latter fender, and the rear of the opposing side.

This patch; I probably could have cut more out of. some rust treatment though should halt any remaining orange avenger.

All in all, I cut back the body filler required to make these areas look better again. It should be noted that I do not intend to make this a show quality vehicle. Although I will surely put painstaking time into doing the bondo right (as an Industrial designer, you learn to do a lot of bondo work on models), I intend this vehicle to be used as it was intended; as a Jeep. I'm painting it with Tremclad, because as I know, "it's bound to happen again."
RR Brakes

May 14, 2009

This is a short post. I had the right rear drum off to a) finally replace it, and b) hook up the right e-brake cable. Having done the other side already, this side was a snap.  I grabbed a shot of the brake guts, and if you look closely, you can see the new brake cable armouring at the bottom.
Also, if you look closely, you'll notice the rust scaling on the frame. It's not too bad, the passenger side (pictured) is better than the drivers side. This probably had a lot to do with the gas tank being on the other side, and nothing trapping moisture on this side. The only real way to fix this is to pull the body off the frame and sandblast it, yadda yadda. ugh, i don't want to do that, so the frame will remain rusty. I don't care about this particular jeep enough to devote that kind of time and money to it; maybe someday with a better candidate that cost a bit more than $250.
Here you can see all the nasty rust that has plagued this thing. By the looks of things, it has been bondoed more than once, and not for rust every time. there are a few "rusted" patched holes, and a few "dented" patches, indicating the lack of care somewhere in this vehicles life (I should call the 8 previous owners and see who's responsible).

All that rust there was beginning to bug me, to the point that i didnt think bondo'ing would be strong enough to hold that kind of a gap. My decision was (with little reluctance, because I like welding) to again grab the grinder and cut out the cancer. More to come on that.

Friday, May 7, 2010

Slappin the Paint

May 2, 2009

To the best of my recollection, my plan was to paint every engine component that I removed. This way, I could more or less colour document what I have had to fix (or at least remove). some of these parts were gummed up with nearly 20 years worth of old oil, and it showed.

I started by popping off the rocker covers, which needed new seals badly. They had been leaking (mainly the passenger's side, noted in picture below) through a homemade silicone gasket and were now well into lubing the manifolds. Although this prevented a lot of rust in that area, it did make for a rather great plumage of smoke once the engine warmed up, not to mention smell.

To my surprise, the rocker arms, seats, and springs were astonishingly clean and free of gummy buildup (which often appears either as black or white buildup). The fact that it was so clean meant the engine is likely pretty clean inside, and bodes well for longevity. It also means i likely have less crankcase gasses, which aids my cause in the e-test depertment.

With the rocker covers off, I took the wire wheel to them and polished off all the old paint, which was peeling and allowing rust to pit some areas. I used some leftover paint from a school project (which happened to be high heat orange) and gave them both a nice healthy coat, same colour as the air-box.
I then moved on to paint the distributer cap, AIR manifolds, and the oil vent filter.
With my new cork rocker gasket installed, and a new exhaust gasket ready to go in, i began reassembling everything, with the obvious intent of sealing the oil and exhaust for good this time. The colour combo of hot orange with gloss white (mixed with a dash of accent red), makes for a pretty good bit of colour. In time more stuff will be painted as it's fixed.
Lastly, I grabbed the mega rusted Y-pipe and began stitching it back together. the old weld seam fixed up no sweat, but i had to cut and patch a lot of the rest of it, so flow is probably less than ideal through that area. Then I gave it a thick coat ofhigh heat white, to match the manifolds.
Note the Grenade/Ammo box.. good for a few BHP.