Monday, April 25, 2011

Plans, Plans, Plans

In a somewhat artistic fashion, I am breaking code with my "chronological order" of things today. Since I haven't worked on the Wagoneer all winter (accounting for the lack of posting), I have devised a sketch in the warmth of my studio. I never really planned out what I wanted to accomplish with this project until quite a while into owning it, possibly because the amount of work was so foreboding that I wasnt able to get my mind past it. 

Now that all my mechanical work is complete (thanks to several days of holiday; and the subject of a subsequent blog), I am able to more or less visualize what I want the Wagon to end up being. First of all, no more woodgrain; this took only a few clicks of the mouse on the net to discover that replacement woodgrain is worth about 4 times what I paid for the truck in the first place, and I can put that money to better use.

One of the nice things about sketching is you can mock up any design you want, whenever you want. Not to sound nostalgic but I still prefer good old fashioned hand drawing over CAD programs or photo manipulating tools; it's typically faster anyways.

This overlay sketch (uses many sketches as underlays to develop the final image) is a rough depiction of my concept for the finished product, using a blend of new custom designed equipment while retaining the rugged mid 60's looks. the stripe (in vynil) denotes the engine displacement instead of using the cliched "V8" emblem, tones which are picked up by the dual exhaust and glasspack mufflers. Thinking of badging it the "Timberline" to denote the sort of rugged landscape this vehicle is built for (like the term "treeline," the timberline is typically the elevation where trees become sizeable enough to be used commercially). 

The utility rack is designed to fit the stock roof rack mounts, while following the contour of the roof and deflecting wind to hopefully aid a bit in aerodynamics; as if it mattered. Front and rear utility bumpers freshen the face from the tired sculpted aluminum ones that made it look so dated. They give it a more muscular appeal, and are far more useful than the original, integrating tow hooks, trailer hitch, winch mount points, and heavier protection.

Although the sketch is along the lines of a 4-6" lift, I will be going for something more like 2" for better road manners, and cost effectiveness. the tires are merely conceptual, but I will likely look for some aggressive tread meat once my stock tires wear out (they are currently brand new).

As an aside, I have never been a particular fan of that grille. I would like to swap in a mid 60's through mid 70's grille, as they are more durable and better looking.
Tuesday, January 25, 2011

Packin’ Glass


September 1, 2010

As with any good restoration enthusiast, it pays to have willing help that often will work for free. Having a brother-in-law close by has been a great boon to this project, as he is often more willing than I am to get his hands dirty and fix stuff. As a Pro mechanic and a master of anything pertaining to older vehicles, I enlisted his help on inspecting some exhaust parts and doing some brake line work before the weather got too cold (winter is an absolute beast; and a legendary raider of ambition)
 
               With one swift tug at the old muffler, it crumbled like a matzah; leaving a 2’ gap between my cat and the rest of the tailpipe. Replacement OEM mufflers are upwards of $50 if I’m lucky, and they really lack in character. Much to my economic benefit (though I assume more for my amusement), Canadian Tire sells a few sizes of CherryBomb Glass-Pack Mufflers. These units are made of heavier steel and are treated in heat resistant paint for longer life. They also are designed to flow straight through, boosting flow by as much as an advertised 40% - leaving the low rumble of the V8 while skimming off the higher pitch noises.


      The fit was just about stock, with the tail pipe being pulled a bit further forward. It made a difference in so many ways that it made the truck sound a lot younger. For starters, it quietened the exhaust from its old rattling hollow muffler problems, and added some much needed rumble. Since these mufflers were designed in the 60’s for muscle cars, it fits my engine like a glove.


       I also turned my attention to treating the front brakes to match my new rear drums. I popped off the rim and set to cleaning the calipre for paint. This adds nothing in terms of stopping distance, but does add a cool focal point on the road when the wheel is spinning. With the help of my brother in law, we removed the front passenger brake line and flex line, and began bending some blank stock to fit (didn’t finish, got too cold). 


Monday, January 10, 2011

Broken Glass & Other Assorted Malice

April 27 - June 15

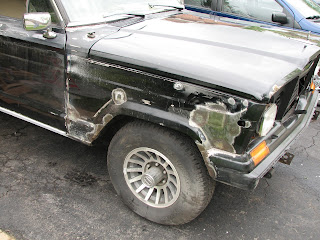
This blog covers a great deal of time (roughly 2 months), so I'll keep it quick as possible. Although the windshield itself was brand new when I bought the Jeep, the framing below was for lack of a better word - Gone. What follows is a pictorial depiction of the reconstructive surgery the beast underwent.

This had been attempt 1 at fixing the rust, but I never liked it and felt that I could do better.

In order to fix these corners, I knew the windshield had to come out. My Haynes manual told me to leave windshields to a professional, and thus wouldn't tell me how to do it. I pressed on anyways (quite literally). i did countless hours of research, and people told me it was easy; just undo the gasket and push in the top corners with your feet. The glass will just pop right out. I even put a blanket on the hood to catch the glass when it came free.


Ugh.... they lied 

After the first break, it would be pointless to try and save it. The only way forward was to smash my way out. I did manage to save the gasket though, which of the 2, was the harder one to find.


 All this missing frame meant the new windshield would face 3 problems if I left it. a) it would let water seep in, b) it wouldn't support the windshield, and c)the installer would refuse to let me get away with it.

 Same goes here. More tricky curves, and in very noticeable areas. The other 2 corners looked much the same.

 Patch #1. it's not that I ran out of metal, the perforated metal is supposed to allow the bondo to hold better around the curve, without falling out later.

 This patch took about an hour of fitting and hammering and bending with pliers (all the proper body-working tools). Once welded in though it followed the lines well. The trick is (or for me) to be just below where the bondo surface will be so it blends better without metal sticking through.

 Sanding after first application. It's looking more complete already.

 Upper corner looking good. It looks more like a bad dent than a new patch.

 Passenger lower corner. Under that bondo is some custom formed replacement metal.

 More custom metalworking, done to AMC specs (built to the nearest foot).

 Initial primer shot. this shows low points and pitting.

 medley of primer, bondo, and more primer. Leveling out now (btw, if anyone sees anything wrong with my methods of bondo-ing, feel free to let me know).

 Shot with a sealing layer of Tremclad. I did find a few fisheyes, and the trem doesnt stick that well to red oxide primer.

 This probably turned out to be my best corner. The windshield guy didnt notice until I told him.

 Passable, but the bodyline could have been softer.

 This was a more functional fix, since most of it is now under the gasket. The paint layers sealed it before I had a new window installed.

 Open cruising concept... it is a Jeep after all.

Awaiting its new windshield.

New windshield in. It looks so fresh, and whe it's all clean you can barely tell it exists from inside. It didnt come with a mirror mount though, so I plundered a scrap field truck for a mount and a mirror.

All in all I was pleased with the results of this semi unexpected fix. It turns out that despite being a rare vehicle, a brand new windshield was less than one for a newer car (and they came and installed it in my driveway).

Tuesday, November 23, 2010

Forgotten Things and an Anniversary

Collective From Earlier in 2009

I know I haven't written in ages, but since I figure that no-one is actually reading this, I can do what I want. 

I'm breaking chronological form here to tidy up a few things I had done earlier in the project. As with any zealous blogger (not me) or totally professional auto restorer (not me again), you will religiously take pictures and sort them so you have an action by action account of your project. While I very much wanted to do this at the beginning, it's been a bit harder to remember recently as i just dive into the issue and take pictures once im done.

anyways, im noting here one of my bodywork pilot projects, which I only took finished pictures of, and some other painting stuff for my transmission.


You may recognize this as my rear right door, the one that had been plagued by such vicious rust that anyone else would have deemed it unsalvageable.  seeing as how wagoneer doors are hard to come by, I decided to take a crack at fixing it full on. I popped open the tin of paint stripper at 2:00am in the schools shop, and tried it in an inconspicuous area first. One thing I learned is that this stuff; although gell, dries really fast, before really having a chance to work on the paint. I made a deep-night dash down to the cafeteria with a classmate (nameless) who helped me snag a bunch of aluminum foil from the dispenser. industrial sized, and thicker than regular stuff, it covered the paint stripper well when I smeared it all over the door, and kept it from evapourating. The nice thing was i could use it again for the second application. once the paint was all removed I ground into the rust with no remorse, and treated it with a rust converting liquid. Note: the pictures above are a preliminary primer, thus still a bit rough.

once it was clean and roughed up, I applied some lovely glass-filled body filler (napa-brand), which has short strands of fibreglass in it to give it strength over holes. I have so far been using it on any areas that are perforated. it sands really well, and I built myself a number of sanding blocks from MDF scraps and old sanding belts. I then honed my model making skills with subsequent bondo-ing, sanding, spot puttying, etc - all the way down to primer. I was pretty pleased with the results after painting but you can see it in a certain light.

Also, I stripped the paint from my tranny pan and let a classmate use up some expensive acrylic paint he had leftover from his motorcycle he was painting (you know who you are). I prepped it with a new gasket and filter from Carquest for $20 since my old seal leaked and the filter was black.


Lastly, today (Nov 23/2010) marks the 3rd anniversary of my owning the wagoneer. Man time flies. anyways, I had thought long ago that it would be a shorter project, but such is life.

Thursday, May 13, 2010

Diving In

May 16-18, 2009

I grabbed at one of those freebie weekends that students get once uni. lets out for the summer, and before they're into summer jobs. Since the job hunting was a little slow, and no one was going to contact me on the weekend anyways, I picked up the cut off wheels, pulled the beast onto the driveway, and began mapping my patchwork with a sharpie.

Sit-rep; there were a good number of rusted out areas, in places that would continue to rust and pucker out any subsequent bondo work. Seeing as I didnt want to make this a rolling Bondo ad, I had already decided the best fix was to cut and remove the badness, and replace it with new 18 gauge steel.

All in all, I think I decided on cutting out 8 of the worst (or most accessible) areas. Some were small (a few sq inches), and some were rather huge, as you'll see.


I wish I knew a little more about welding surface tension before welding in these patches. The tension up front there warped the panel a bit, but I managed to coax it back into place with some light body hammer tapping and a steel dolly.

My largest, most complex patch yet, which encompasses 2 angular body lines, and a sweeping curve, as well as a "cross curve" lip to follow the old fender lip line. Tricky. I decided the best way to tackle it would be to do it in 3 stages, through each of the 3 "stepped" areas.
Step 1 encompassed the first angled body line and fender lip.

Step 2 covered the 2nd patch area, leaving the largest and most complicated for last.

All in all, I was pretty pleased. There is a bit of a recess where patch 2 and 3 meet, along the fender line, but I can probably just bondo that in.

I also patched the top of the latter fender, and the rear of the opposing side.

This patch; I probably could have cut more out of. some rust treatment though should halt any remaining orange avenger.

All in all, I cut back the body filler required to make these areas look better again. It should be noted that I do not intend to make this a show quality vehicle. Although I will surely put painstaking time into doing the bondo right (as an Industrial designer, you learn to do a lot of bondo work on models), I intend this vehicle to be used as it was intended; as a Jeep. I'm painting it with Tremclad, because as I know, "it's bound to happen again."

RR Brakes

May 14, 2009

This is a short post. I had the right rear drum off to a) finally replace it, and b) hook up the right e-brake cable. Having done the other side already, this side was a snap.  I grabbed a shot of the brake guts, and if you look closely, you can see the new brake cable armouring at the bottom.
Also, if you look closely, you'll notice the rust scaling on the frame. It's not too bad, the passenger side (pictured) is better than the drivers side. This probably had a lot to do with the gas tank being on the other side, and nothing trapping moisture on this side. The only real way to fix this is to pull the body off the frame and sandblast it, yadda yadda. ugh, i don't want to do that, so the frame will remain rusty. I don't care about this particular jeep enough to devote that kind of time and money to it; maybe someday with a better candidate that cost a bit more than $250.
Here you can see all the nasty rust that has plagued this thing. By the looks of things, it has been bondoed more than once, and not for rust every time. there are a few "rusted" patched holes, and a few "dented" patches, indicating the lack of care somewhere in this vehicles life (I should call the 8 previous owners and see who's responsible).

All that rust there was beginning to bug me, to the point that i didnt think bondo'ing would be strong enough to hold that kind of a gap. My decision was (with little reluctance, because I like welding) to again grab the grinder and cut out the cancer. More to come on that.

Friday, May 7, 2010

Slappin the Paint

May 2, 2009

To the best of my recollection, my plan was to paint every engine component that I removed. This way, I could more or less colour document what I have had to fix (or at least remove). some of these parts were gummed up with nearly 20 years worth of old oil, and it showed.

I started by popping off the rocker covers, which needed new seals badly. They had been leaking (mainly the passenger's side, noted in picture below) through a homemade silicone gasket and were now well into lubing the manifolds. Although this prevented a lot of rust in that area, it did make for a rather great plumage of smoke once the engine warmed up, not to mention smell.

To my surprise, the rocker arms, seats, and springs were astonishingly clean and free of gummy buildup (which often appears either as black or white buildup). The fact that it was so clean meant the engine is likely pretty clean inside, and bodes well for longevity. It also means i likely have less crankcase gasses, which aids my cause in the e-test depertment.

With the rocker covers off, I took the wire wheel to them and polished off all the old paint, which was peeling and allowing rust to pit some areas. I used some leftover paint from a school project (which happened to be high heat orange) and gave them both a nice healthy coat, same colour as the air-box.
I then moved on to paint the distributer cap, AIR manifolds, and the oil vent filter.
With my new cork rocker gasket installed, and a new exhaust gasket ready to go in, i began reassembling everything, with the obvious intent of sealing the oil and exhaust for good this time. The colour combo of hot orange with gloss white (mixed with a dash of accent red), makes for a pretty good bit of colour. In time more stuff will be painted as it's fixed.
Lastly, I grabbed the mega rusted Y-pipe and began stitching it back together. the old weld seam fixed up no sweat, but i had to cut and patch a lot of the rest of it, so flow is probably less than ideal through that area. Then I gave it a thick coat ofhigh heat white, to match the manifolds.
Note the Grenade/Ammo box.. good for a few BHP.