Thursday, July 17, 2014

Brand New Suit

Sept 16-18, 2011

I believe this is the first time the rig had any kind of even colour since I bought it, and a week long rest had the enameled paint curing nicely. However, I was on a tight time crunch and needed the booth for the rest of the puzzle, so I

sliced through my masking and hopped in.


I fired it up and pulled it out into the sunshine, all gleaming-fresh. Lets just say, this part of the stage felt good, and I was pretty proud of myself for almost seeing a vehicle related project through (I have a history of being bad at that, as my Willys trucks will attest to).


I knew I should be making progress on the doors, hood, and fenders, but I couldn't help but toss some of the trim and lights back in for a sneak peek. It was lookin pretty fresh.


I know Bondo has a bad name to real bodymen, and in the future I will try to work on my metal skills, but I was particularly proud of the dog leg at the back door, which was non-existent before. I welded in a patch panel but had to finish it in filler, I think it sculpted pretty well.

Body Paint

Ahem -tap tap, is this thing on?-
 
So the cobwebs have been gathering here since I last posted nearly 2 years ago. I freely admit, getting married and buying a house/renovating take a lot of time, so posting on here about the old beast has been on the back burner.

However, just because I have dropped off the radar as far as posting goes, I did actually make progress with the Wagoneer and eventually finished it up. Perhaps it's time for the next installment.

Still in the window of Sept 5-8, 2011

Lets face it, reading "I sanded, checked for high points, then added a little filler" 50 times can get a little redundant, So I will dispense with the tediousity (oh yes, I made that up) and get straight to the juicier portion of the project.

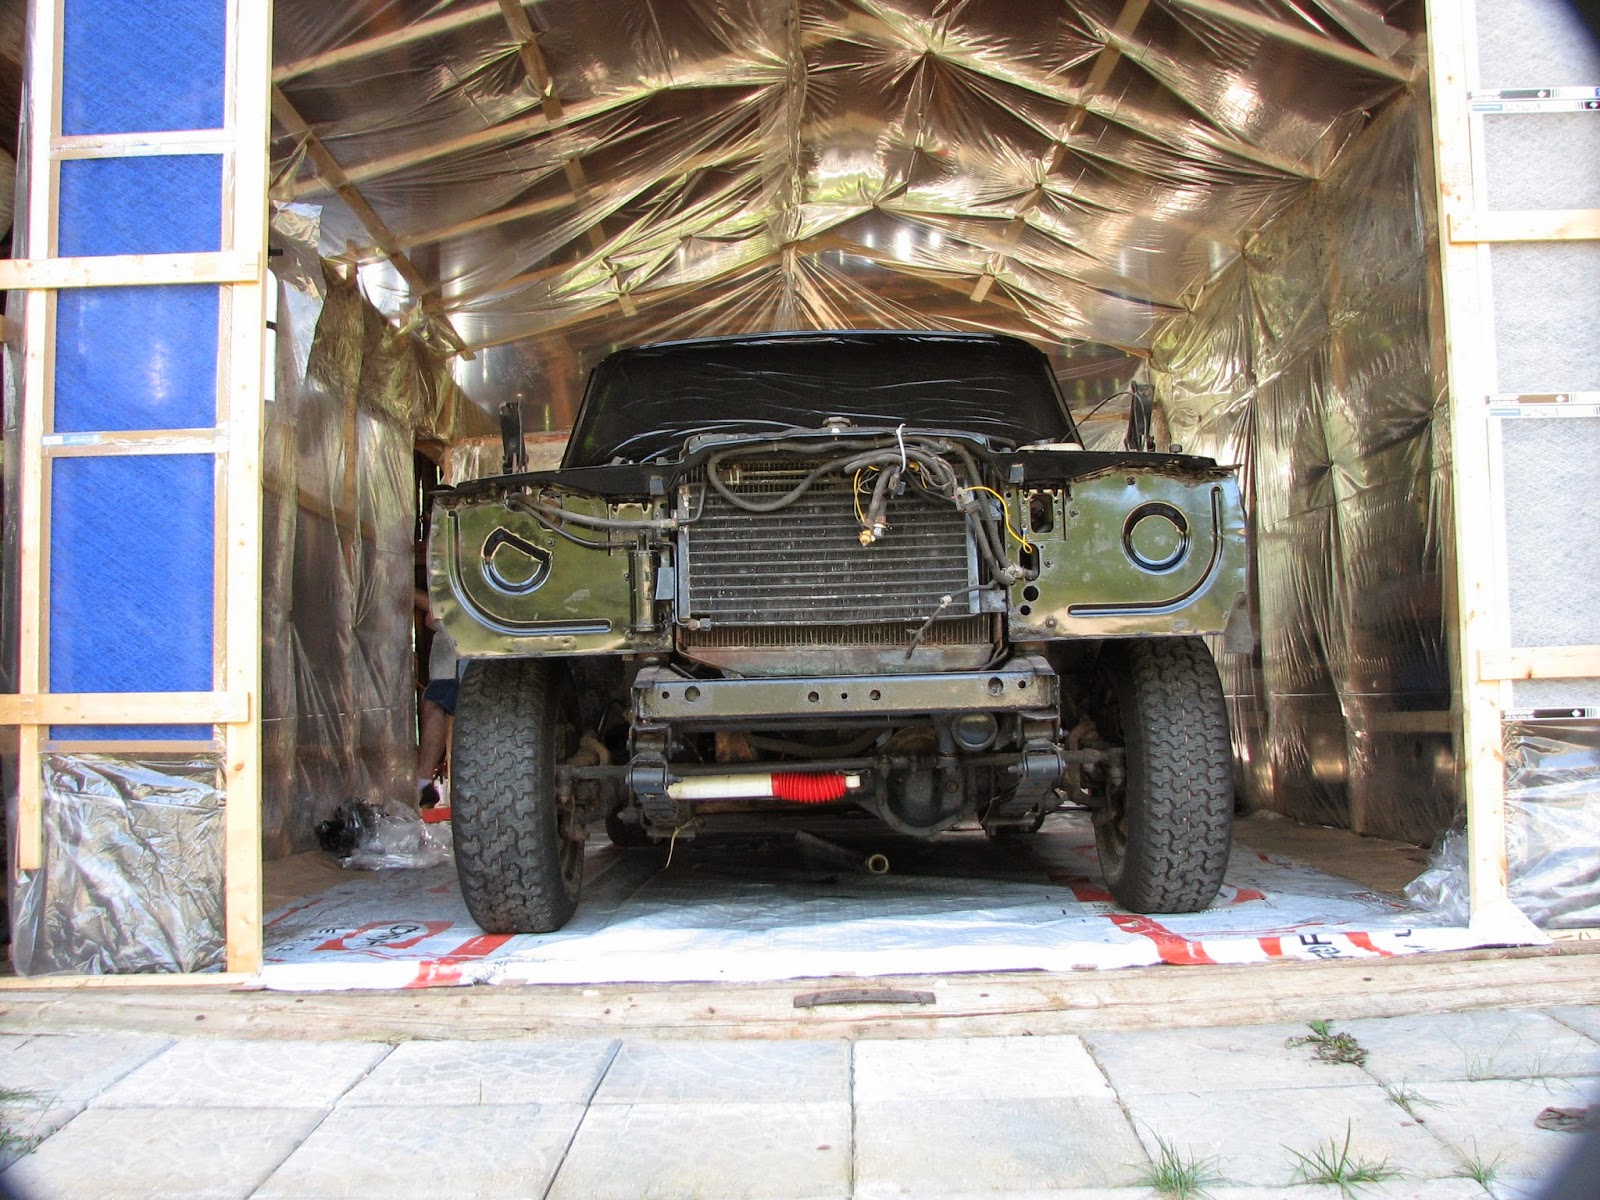
I lumbered the old girl into the fresh new dust free stable I had built for it, and set about masking anything I didnt want to have painted. I masked off the door openings, the engine, the tires (er, 3 of them anyways, I seem to have missed one somehow), and the rear window. in a flash of brilliance, I simply stuck the plastic sheeting in the window and rolled it up, seemed to work just fine.


Looking back, there are a lot of things I would have done differently here. It needed more sanding in spots, and there were still small patches of rust that I kinda just painted over. I think my exuberence mixed with the acceptance that this thing had more rust than anyone would ever likely care to deal with made me decide to simply get on with it and start enjoying the vehicle.

I popped open my gallon of black tremclad and poured maybe 1.5L into a clean mixing pail and began thinning it down to a sprayable viscosity, thick enough to avoid runs but thin enough to self level. Having never done this before, I was just guessing based on my research.


After a few test sprays to get the viscosity worked out and the gun dialed in, I set to work starting with the roof and working my way down. My dad had a car battery booster running the downdraft fan system and I must say it worked very well sucking a lot of overspray out of the booth.

The whole process took maybe 15-20 minutes if I recall, and I was pleased with the results. No runs that I could find, and a nice even coat.


Are you ready for it?


One problem I did have was that since my gun had a fixed coupler, I couldn't get the gun low enough to spray the very bottom of the rocker panel. a little spray paint from a can fixed that.

I let it cure and then hit the whole truck with a second coat, covering up any spots I'd missed and giving it a much more finished look.

with the truck curing (I left it for a whole week in the booth), I set about the last of my body panel prepping. You know the drill, fill, sand, check, repeat, until I was as happy as I'll ever be with the results. More on that soon.

Thursday, September 20, 2012

Paint Stripping 101

Sept 5-8, 2011

4 days, and as many big containers of serious duty paint stripper; these are the ingredients that spell exhaustion and asphyxiation in a single breath. I seem to recall going through several packs of sandpaper in these days, course, medium, and finer. I had discovered a trick when stripping the paint off the rear door back in school, and had pillaged about 20' of tin foil from the cafeteria in the middle of the night to seal up the gel-based paint stripper. Covering the gel helps trap it against the paint, and does not let it evapourate. The beauty of this is it has lots of time to work on the paint and doesnt stop until it hits bare steel.


This step of the restoration is where I finally discovered how much Bondo work had been done in the past, which happened to be quite an astounding amount. There is no panel on the truck that does not have Bondo on it, making up for ripples, sags, dents and puckers. Luckily for me the paint stripper didnt touch the old Bondo, so I was able to salvage a lot of the labour that someone else did that was frankly, sometimes better than my own.


Peeling off a layer of tin foil and having the old paint come with it is extremely cathartic... though not as much as running the sharp blade of a steel scraper underneath the paint and wtching it peel off in a big sheet. In lots of areas the paint practically offered to leap off the truck on its own, and in some places it held with the tenacity of a petrified freestyle climber.

I'm not sure if these pictures make this part look glamourous at all, but aside from the feeling of peeling off paint, this process is quite long, labourious, tedious, and boring. I got to the point where it was, just a step in restoration, nothing to look forward to.

Wednesday, February 15, 2012

Dismantled

September 2, 2011

Day one of the rejuvination prep is taking everything apart for painting. A trick I learned in modelmaking at Humber is to paint in pieces, instead of masking and painting the unit as a whole. this leads to a better, more complete paint job that looks closer to what a factory finish would look like; and since I was painting with tremclad, this would be paramount in helping me get the most bang for my buck.

Step 1 of the tear down was taking the doors apart. I pulled off the interior hardware and panel, unplugged all the electrical gubbins, and unbolted the outer door handles, which on a Grand Wag, require some very aerobic tool action and a lot of close quarters wreching around sharp steel edges. my tip would be to undo the door latch and let it swing out of the way slightly to make room for a universal joint ratchet.


Also, i had removed the rear bench and left it at home, so out came the mounts and seat belts. Shortly thereafter I removed the front seats for total floor access; but not before I'd taken the new lightweight Wagon Supperleggera for a spin up the road.


I must admit, the truck felt so much livlier with all this weight off. It sat higher and the backend was very frisky for a 6000lb truck. One of these on a strick bush-truck diet of no doors, glass, or uneeded bodywork would be very capable indeed.

I also took the time that night to mix up a pot of older tremclad gloss black with a bit of thinner and painted the entire floor with a brush. Since it tack-dried quickly I could redo a second coat as soon as I had finished the first, so I got 2 good coats on the floor to make it all even and dark. this really transformed the patchwork floor into a nicer uniform colour. The thinning was not so much for the rapid drying, but so the paint would self level better since it would be thinner and not so oily.

Saturday, February 11, 2012

Northbound

September 1, 2011

Ah, the smell of the open road. Cargo packed to the ceiling, spare tire riding shotgun on the roof, and the whistle of wind over poorly-fit chrome trim. This is what Wagoneers were built for; taking you, and everything you require, anywhere you need to go. There is something to be said for the evocative rumble of a V8 as it stares down miles of open highway under a cloudless sky, drumming the tune of an era that has long since forgotten it. September 1st was one of those days.

Naturally, having only driven the Wagon on short trips close to home, I was trepidatious in light of the myriad of ways that long distance and heat can bring down an old V8 with ease. To counter this doubt, i opted to throw several jugs of rad fluid, oil, and tranny fluid in the back for the seemingly inevitable hiccups.

The Wagon was loaded with all the necessary equipment required to complete the bodywork, strip the paint, build the rest of the booth, and paint the entire truck twice over. Needless to say the back sat considerably closer to the road when I set out.


Having planned to spend 10 days up north, my family flanked me with our other 2 vehicles so that if anything happened I wouldnt end up taking out someone elses car. They would also play a critical role in helping finalize the booth, and run the air evacuation system while I sprayed the truck.


My sister managed to shoot a number of good "en route" pics; but the above proved to be my favourite of the bunch. Not only is the image sharp while taken from a car, the composition of the shot with the two generations of Jeep and the two generations of drivers is well laid out as well. If ever there was a shot that made the final edition grille look alright, this would have to be it (paired with that bumper as well).

I did stop about 3/4 of my way into the drive to grab dinner at the Subway in Marmora (another plug, they make the best subs of any Subway I've ever been to) and to gas up for the remainder of the drive. Here I was reminded of how picky a hot carburetor can be, taking a good 10 seconds of rolling before it finally atomized the right mixture to catch the spark.

I arrived at the farm with no mechanical troubles of any real nature. I knew my radiator was running sub par so I did have to run the heat to keep it normal, but it pulled as cleanly as possible for 40hp per ton, and never felt like it was about to fly apart when I hit 100 on the highway. I did enjoy the retro-stereo that pumped Led Zeppelin 4 through a single 1990's speaker, with all the clarity of a tax return form.
Friday, November 18, 2011

Custom Bumper

August 30, 2011


Given that I had been running bumper free since some time in 2008, I had finally come up with a complete design for a front bumper that would replace the tired and faded aluminum one. This bumper used new formed brackets that bolt to the frame (they almost fit; I will revise the design so the holes sit further back… I had to ream out my frame holes). The body of the bumper is of unitized construction, all built into one piece, making it stronger. The tow hook tabs are mounted as high on the bumper as possible to allow for a more aggressive approach angle, and are directly in line with the frame rails for added strength when pulling (as opposed to being pulled, which should never happen).


I had completed the CAD work for this design 3 weeks prior, and had sent it off to the fabricating shop for a quote. In order to build it to my design the front middle section (with the tow hooks, and the wrap under below it) would have to be built separately and welded in, with the weld running along the leading edge of the bumper. This wasn’t a big deal, except the edge wouldn’t be that nice rolled form it would have been from a machine. All said and done this bumper cost me $350 (unpainted), which when compared to the $600-$800 price tag of bumpers from other aftermarket manufacturers, seemed like a pretty good deal.


I was able to mount it with relative ease, with the help of my parents to hold it in place while I fastened the brackets and the bumper to the frame. The fit was good, with a bit of filing to get the frame holes in the right spot. I had planned to paint this at the same time as the rest of the truck so mounting it meant I wouldn’t have to carry it up in the back.


This bumper certainly gives the truck a more aggressive appearance, and makes it look like it belongs to a 23 year old as opposed to a 63 year old (who would suit the woodgrain and rubber bumperettes). I’m not as opposed to that plastic grille, but would still prefer something off an older rig, with round headlights. I plan to paint it satin black, so at least it looks like powder coating (though hopefully it doesn’t behave like powder coating).

Giving it the Once Over

August 23, 2011
 Sit Rep: There are a few faults it must be said; the engine leaks oil, the tranny leaks fluid, the radiator is on borrowed time, the clock disappeared, the AC is disconnected, the rear view mirror has fallen off 4 times, and my left rear door lock is sticky. That being said I can live without AC, I can manually unlock 1 door, and I can look at my watch. The leaks I will have to fix before they turn my driveway into a tar sands. With winter coming on, my radiator will last me until the spring so I have shopping time (replacements are $800, re-core’s are $300).


I took the truck for a bit of a spin up into the countryside north of where I live, to test out the systems on some quieter backroad routes. It’s a fun drive; being in something much older than other cars on the road. There is a sense of nostalgia as you look past your non-airbag steering wheel out over the large hood with a chrome ornament perched atop it; very non-Kia.


I snapped a few Camera Phone pics of it parked at an old school house. I realize the patchwork of paint, primer, bondo, and steel make for an interesting look, but that will soon be gone, along with that out of place bumper which I took off when I got home.