Wednesday, December 23, 2009

Facelift

November 1/ 2008


As is obvious in the above picture, the steel back-panel behind the plastic grille was in some need of repair. Namely it was shallow rust pitting that had eaten the steel and generally dulled the paint.

as an interesting aside, you may note the round cutouts behind the square headlights, along with the round cutouts to the inside. the knockout for the rad is also strangely well thought out design-wise. There is a simple explanation for this though, and it has to do with Jeep's *cough*laziness*cough*. Jeep had it in their mind that instead of changing the body style like other competing automakers, they would simply stick a new grille overtop of the original 1963(ish) grille steel.

This handy Chart (Prepared by someone by the name of DANHS) shows all the Grilles over the years; all of which were backed by the grille you see in the upper left (minus the chrome pieces). I would eventually like to revert mine back to the rhino or the razor grille, since they look so much better than my worn out, cracked, and faded plastic grille.


That aside, I removed my plastic grille, affixed with only 3 real bolts, and an assortment of oddly placed screws that held it to the body (oh the woes of what are termed "old man" fixes). I gave the whole surface a sanding, and removed the rust with the wire wheel and some rust converter stuff. the shallow pitting was pretty easy to fix with some light bondo work. I took the front bumper off too, since it had rotted out at the mount points and wouldnt pass certification. masked the essentials and shot some primer onto the grille to provide a good base.

with that done, i grabbed a can of canadian tire near match black I wanted to use up (this was more to see what it would look like and get it all one colour, as opposed to a final painting). turned out pretty well I'd say.


Also, after doing this, I fixed my turn signals (which had some broken plastic clips, and were simply screwed in by wedging them with screws drilled through beside the lens (more old man fixes). i made some new sprung steel clips and mounted them to the lights, and probably fixed a few other things in the process.. i dont entirely recall.
Tuesday, December 15, 2009

Fixin the Trunk

September 15-20/2009

Sitrep on the trunk: in the words of Jeremy Clarkson: "it's all broken." As posted in a previous blog (sometime in december 07), I removed the carpet and found the rear seam to be more or less non-existent. I once again grabbed the trusty angle grinder, and set about playing surgeon. I severed off what i could, which involved removing a rather hefty piece of metal that runs across the rear seam. It had fallen victim to the plauge of what i call "cauliflower rust;" where the rust seems to split the metal open, and continuously fan it out in a puckering flaky mess... which in some ways resembles cauliflower.

With a now 2 inch wide chasm between the rear panel and the trunk floor, I had a bit of a conundrum; how do i span the gap, which is corrugated on one side, and flat on the other? since the floor is typically made using high-pressure press dies at the factory, I really couldn't duplicate it to factory spec. i did however, have a garage vice and some hardwood floor blocks (maple, no less). I set about measuring and marking out the shape of the corrugation into the 2 blocks, making a male and female portion to be mounted in the vice. Since it was a lighter duty vice, and a rather awkward bend, I had to use a slightly thinner guage steel so it would form better. I stripped the siding off a free shelving unit (properly treated and stripped of it's paint of course), and cut out a piece big enough to span the gap. I then marked out where to put the depression in the metal, and set to work.


I had to press it in 3 sections, because doing an off center press on a piece that long would curve it wildly because of tension. I tacked everything in, then secured it with some light welding


over the next few days, I finished up the pressing and welding, and shot down some paint to keep it from rusting. also got it from below too.


I also took this opportunity to sand down the tailgate and window cover, and give them a coat of paint.


Lastly, to use up the can of paint, I gave my drivers floor a light coat of black to tone it down a bit.


Safety First

September 13/2008

With the majority of the floor patching done a while ago, I figured I should paint it before it rusted; too late. Some time spent with the wire wheel cleaned it up as well, and i was able to get some paint down on the drivers side.


I also managed to patch some nasty rust that had plagued the B-pillars, around the seat belt mounts. since the mounts were made of pure rust, i grabbed the strap, gave it a good tug, and with one hand ripped the drivers side belt from it's moorings. the passenger side wasn't much better; a turn of the bolt more or less broke the entire assembly free from a semi rusted mount. I braced the mounts, welded in new nuts, and stole some old belt mounting bolts from an 84 Buick Century I had laying in the field. I then welded a piece of sheet steel over the old hole, and shot it with primer.


With that done, I did a test to see if everything still lined up. Didn't care so much about the prettiness of the welds for 3 reasons. 1) you'll never see it; 2) it's a flux-core wire, and 3) novice welder on sheet steel.

Friday, December 11, 2009

Moving Along Nicely

September 8, 2008

During the time between the last update and this one, I had done some work to the passenger side. The rocker panels here went together in a far more contiguous manner. the fit was also better when mounting them to the vehicle (I am learning!). Since the B-pillar actually existed on this side, I was able to simply weld it back onto the rockers. this is probably stronger than the other side, which i had to rebuild completely.


After welding the rockers together a while back, I left them unpainted. This was a bit of a mistake, as the rust crept over the surface like lichen on a rock. a few minutes spent with a wire cup brush on the angle grinder fixed this, and i slapped some primer on them to keep away the rust.


Everything about the passenger side was better. there was more floor left, more pillar, andstronger mouning brackets. The other side had sufferred a great deal more rust (which, as of december 2009, i havent completely fixed). The seam between the floor and the rear wheel arch had started popping apart , and rusting away so that rejoining it would be difficult. I should have fixed it when i had the gas tank out, since i don't particularly relish welding above the tank while it's there.. full of petrol.

Wednesday, December 9, 2009

Patchwork

July 18, 2008

I'm Fairly certain I must have done something on the vehicle between mid april and this point. Likely a few electrical things, some engine stuff, or making more lists.

The meat of this post was my surmounting of the driver's side rocker panel and front floor area. Getting the rocker pieces to line up to each other was as easy as; to quote John Candy: playing pick-up sticks with your butt cheeks. It was difficult to say the least, but not impossible. I managed to get them welded together, then set about marking them out so i could match them up with what was left of my rockers. The AGCOW was brought in again to do some surgery, and it did a pretty good job, but my line up was a touch off in a couple places; as I left a slightly larger gap than I had wanted. I did the welding on the tailgate, splicing pieces together with braces made from scrap metal from the school's shop (as it turns out, most of the metal I did the floor with came from the school's scrap bin).


For the most part, I would say that everything went together quite well, and I was looking forward to rebuilding the bottom of the B-pillar (since the doors sort of just hung there, and the side of the truck wobbled when i closed the door).

...No Longer a Woodie...

April 18, 2008

It's gone. The supple and oh so quintessential woodgrain panelling that once bedewed the Luxury-Liner had to go. As much as I had wanted to keep it, there was some fairly serious cancer eating away underneath the vynil. A warm sunny day was the ticket, and it came (apparently) on the 18th. with no cloud cover, and warmer temperatures, the steel heated up quickly (especially being black paint). this allowed me to simply grab/slice a small corner, and begin peeling. If i peeled well, the woodgrain would peel of in one big sheet. it was all stretched and mangled by the end, but it was off. it also left most of the adhesive behind; but that doesnt matter cuz im stripping the paint anyways. I snapped only couple pics for some reason though.


One of my regrets was not taking more pictures; I would always get so into the work that I would completely forget to take snaps of what i was doing. This, in turn; leaves you the viewer without the true experience (that being said, I can picture some of you.. mainly Josh, saying "ya nobody cares Eric"). At any rate, I wish I took more pics for myself, so that I could remember what i did. From this point on (as in December 2009), I will try to take a lot more pictures.

That paint/rust on the grille steel is nasty. gotta fix that. I think the grille was off, just to make it feel more like a project-truck

It's Like Liposuction

April 10, 2008

I grabbed some time on one of those nice April days; the kind of days that still have a crispness from the previous winter, but the nasty spring-thaw has had some time to relinquish. Since the wagoneer was now bound to my property by a) not being road-legal for some time, and b) being too expensive to tow/float to the farm, it was high time to dive into some full on rust-curing. 

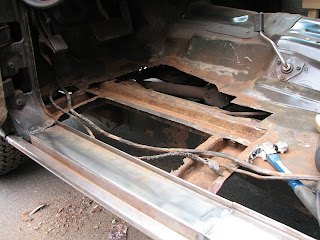
Armed with my trusty grinder and a pack of COW's, I began slicing out body steel that would need some serious attention (which is to say, would need to be replaced). I sliced off almost the entire length of rocker panel on both sides of the truck, because they were in atrocious condition. the nasty pathetic old patches you see here were also removed.


Prior to becoming a surgeon, I took measurements and made a template for the new rocker panels. A trip to a steel supply centre with a classmate provided me with $40 worth of steel stock that i had cut into specific sizes. I spent a great deal of time at Humber College's prototype shop getting everything marked out, bent, and assembled. the results were pretty decent I thought, for never having worked with steel to that extent before. the replacement rockers are sitting in the back of the Jeep (built in 3-foot sections, since our metal bender is not big enough for the whole piece).

Also cut out the rear seam in the trunk, as you can see in the above image. As a general idea of what kind of rust this thing had, just peruse the following pics.


Things Are Slow...

Post March 16, 2008,

Not much happening at the moment. This was around the time that we were working on our chair designs, and as I Recall, mid-March was pretty hectic. I did take some pics however, but most of em are sort of more of the same thing I had taken previously.

Probably a Good a time as any to get around to doing a bit of background on the vehicle I seem to spend so much time on.

This Particular Grand Wagoneer was made in 1991; June to be exact. Through research that I did a while back, I found that they made only 1500 Grand's that year, and that Jeep finally brought a 30-year production run to an end in July of the same year; one month after mine was built. Significance? Of the several hundred thousand Wagoneers to leave the assembly line over the previous 3 decades, this particular one is one of the final 100-200 ever built. If I did some kind of vin.# check, i could probably find out how many were built after it. That sort of makes it special as a Final Edition unit (though the first owner opted not to have the commemorative plaque they put on the final model's dashboards). There is a body panel (the grille steel) that has been dated November 1992, leading me to believe it was a replacement panel for what could have been a small accident.

Specs:
Engine: 360 cu.in. V8; 2bbl Carb
Horsepower/Torque: 144hp/280lbft i think. thereabouts
Curb Weight: 6,200 lbs

Friday, December 4, 2009

Gutted

March 16/2008

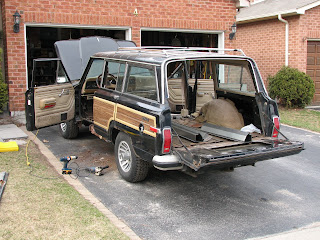
been a while since i had last taken pictures, i cant entirely remember what i did over that while. Evidently form the pictures, i had gutted the interior completely, and put the hood back on (fearful of more blow-overs).


To say i simply "took out the seats" would be a bit of a misnomer. In reality, i more or less wrestled the seats free of the vehicle. To give it some perspective, it would be much like wrestling the nose off of George Washington on Mt Rushmore. The seat mounting bolts were so rusted that they had absolutely become one with themselves, the seats, and the body. problem was that all i could fit under the seats (for the most part) was a typical spanner and a WD40 stick. there wasn't enough room for a grinder to cut them from above, so i had to move below. while i was able to cut/drill out one of the mounts from below, the others were sealed inside one of the body rails, rendering them accessible from the top only. after a long time, and a dinky little hack saw, i managed to cut through the bolts by hand (which meant cutting through the nut first, making it even thicker). The seats finally relinquished their hold on the floor and gave way, though they weighed enough to hold themselves in place without bolts.

the seatbelts you see in the middle of the transmission hump are immutable; i finally gave up after breaking several T-55 torx heads, and will just mask them for the final floor painting.


Also, i narrowed my sputtering problem to a seized accelerator pump (in the picture, the little lever-actuated pump looking piece on the front of the carb), so i popped it off, and managed to work it free. some fine sandpaper and wd40 managed to clean it up, and the problem was solved.


Rocker Panels... What Rocker Panels?

January 19/2008

Being one of the first non-frigid days we'd had in a while (not to mention snowless), I thought i'd take a crack at ridding the poor vehicle of some more of it's cancer. Im not sure if there's a technical term for curing Jeep cancer, but i have come to know it as my angle grinder with cut-off wheel (AGCOW for short). Before the resto began i snapped up about 2 dozen COW's and a free angle grinder from my grandfather (didnt need it anymore, so it became strictly a resto-tool). I highly reccomend the Ryobi-brand angle grinders; cheap, comfortable, and have a nicer switch system than most brands.

I plunged the wheel into the metal, only to find that most places cut like a surgeons knife through onion-skin (ie: there was not much left in terms of metal). I did find it odd that once i had completely cut away all the metal, the rocker didn't come off. As mentioned in a previous post, this was because someone saved their pennies by not doing a good rocker fix. In order to fix it, they injected expanding foam into the decrepit rockers, and bondo'd over it. this had mostly come off, but the foam stayed fast. it took me quite a bit of pulling to remove it all, but it finally came free. I only pictured the one side, simply because the other side looked the same.


Wednesday, December 2, 2009

Yikes!!

December 10/2007

SitRep: I lifted the carpets. Don't ever lift the carpets unless you are very prepared for what you may not find: floor. It would seem that, through the vehicles life of neglect, people have had the carpets up before, in order to patch a gaping hole in the floor the size of Cincinnati. The remedy: grab the nearest scrap appliance you can muster up, slice a hunk of metal out of it, and affix it to the floor with a thrifty assortment of rivets. As more carpet came up (that which wasnt frozen to the vehicle), it became more apparent how much work I was in for.


Side note: If anybody ever decides to restore or semi-restore a vehicle for road use (which I highly reccomend; the experience is terrific), make sure you don't look at the project as a whole. I ended up with 4 pages of "things to fix" on this vehicle, and would never have tackled it if i looked at it all at once. The key is to break it up into unbelieveably specific tasks (which more than doubled my list length), and organize the tasks into a timeline (if you just dive into it, you'll likely bog down and give up). I broke my list down to the point of even listing each bolt that needed drilling out (writing out every single step, no matter how long the list gets, actually makes it feel like less work). This may sound nerautic, but as i checked off items from the list, it felt like i was flying through them (it's really just a psychological trick, that broke it into a set of small rewards, instead of large tasks).

The trunk carpet also came out, revealing a number of rusted gaps between the floor and the rear seam (fixing that was broken into about 5 sub-steps), followed by all the wall-carpet, which were in fairly rocky shape. Being a luxury SUV, Jeep put extra thick, supple carpeting in these beasts. This was great for the debutante types that swept them from the showrooms, but not as ideal for 8th owners (such as myself). The carpets tend to collect moisture, and hold it for long periods of time. This would in turn fog up the vehicle to an insane level once it warmed up enough, and also managed to rot out the floors from the inside out (thus explaining why i didnt realize it when i first examined the vehicle). I started taking stock of what needed fixing, and decided to start amassing my tools into the garage (which was then organized, at least initially). That being said, I didnt manage to do much more than tinkering through the rest of December (it was too cold anyways).

Also, in my zeal, I removed the hood, thinking that it would help in allowing me to access the engine. While that may have been true, i stupidly put it beside my house in the garden. A stiff winter wind blew between the houses and knocked it over onto a rock, putting a dent (albeit small) in what was arguably the most rust and dent free panel on the vehicle.


Tuesday, December 1, 2009

Exploring the Goodies

November 25/2009

There was a lot more snow in late November of 2007, more than this year (none so far). i knew there was a bit of work to be done, but i didnt start because i was still on the 10 day permit and didnt want to waste time. needless to say the G-Wag went everywhere that I, or my family went in those 10 days (to the library, train station, church, etc). i spent the better part of a cold sunday afternoon poking about the interior of the jeep and doing a bit of light detailing, such as vacuuming, armour-alling, and power washing (the exterior). the old windsheild had been smashed out by neighborhood kids, so a brand new one was in it's place; no chips, scratches or cracks. also noted that the tires were so new they still had the coloured ink banding inside the tread, and most of those little knubby things. i figure a set of 4 new truck tires would run you $400 minimum, so it's like i bought 4 truck tires, and they threw in a truck with the deal.

astonishingly, most of the power-options worked, which was a bonus. the trouble came in the tailgate, which is Jeep's fault for using a stupid wiring method that bends every time it opens and closes. the power tailgate window worked, but the power switch,wiper, and defrost were all pooched. the rest of the power windows are rather lethargic, but they all operate (some lube might help that, possibly). the headliner was.. well, we'd better not discuss the headliner.